I recently migrated a personal project in Django from a VPS (set up back in 2011) to App Engine Standard on Google Cloud Platform. The docs and materials I could find online were helpful, but they were all focusing on setting up a new project from scratch. So in here I wrote down some notes on migrating an existing Django app along with its data to App Engine Standard.
Background: Django on GCP
There are no fewer than 4 different options for hosting Django on GCP :
- App Engine standard environment
- App Engine flexible Environment
- Google Kubernetes Engine (GKE)
- Compute Engine
As I was looking for minimal maintenance, I went for what seems to be the most automagical, hands-off option: App Engine Standard. It also fits nicely with my other objective of minimizing the monthly cost. App Engine Standard “scales to zero” -> when there are no requests, the number of automatically scaled running instances can fall to 0.
Prerequisites
The notes assume that you’re already familiar with Django, but not necessarily with GCP. I wrote this based on my experience migrating an existing project, but you may be able to use it to set up a new one from scratch – you’ll be able to skip some sections.
To follow along, you need a Google Cloud Platform project. To set one up, head over to the GCP Console . Some of the features we’ll need (in particular: setting up an SQL server) require enabling billing.
We also need to install Google Cloud SDK
, and then run gcloud auth application-default login to set up the command line tool credentials for accessing our newly created GCP project.
Once we have a GCP project created and the credentials for the gcloud client tool configured, we need to enable App Engine within the project:
gcloud app create --project=[YOUR_PROJECT_ID]
This command asks us to pick a geographical region where the application will be hosted. As most of the users of my app in question are in Poland, I picked europe-west3 in relatively nearby Frankfurt, Germany.
Set up the database
Of the databases officially supported by Django, two are available on Cloud SQL (GCP hosted SQL service): MySQL and PostgreSQL. Either should work, I went with PostgreSQL because this is what I was already happily using in my previous deployment.
Export existing database state
I started by creating a database dump from my current database. For that, I followed the official docs of PostgreSQL . (The MySQL equivalent .)
The command to create the database dump looks something like this:
pg_dump -U [USERNAME] --format=plain --no-owner --no-acl [DATABASE_NAME] \
    | sed -E 's/(DROP|CREATE|COMMENT ON) EXTENSION/-- \1 EXTENSION/g' > [SQL_FILE].sql
or
mysqldump --databases [DATABASE_NAME] -h [INSTANCE_IP] -u [USERNAME] -p \
    --hex-blob --single-transaction --set-gtid-purged=OFF \
    --default-character-set=utf8mb4 > [SQL_FILE].sql
After saving the data base state, we can go to Storage in the Cloud Console and upload the resulting .sql file to a temporary bucket. This will allows us to import it in the next step.
Set up Cloud SQL server
Time to set up our brand new SQL server hosted on GCP! This part is covered by the official docs here: PostgreSQL , MySQL . Before proceeding further, we need to enable the sqladmin API:
gcloud services enable sqladmin
Head over to SQL > Instances
and click on Create instance. When selecting a region, it makes sense to pick the same one as the one we picked for the App Engine project, to ensure low latency between the application server and the DB server.
As for the other configuration options, the creation flow in the GCP Console seems to pick sane defaults, so I went with that:
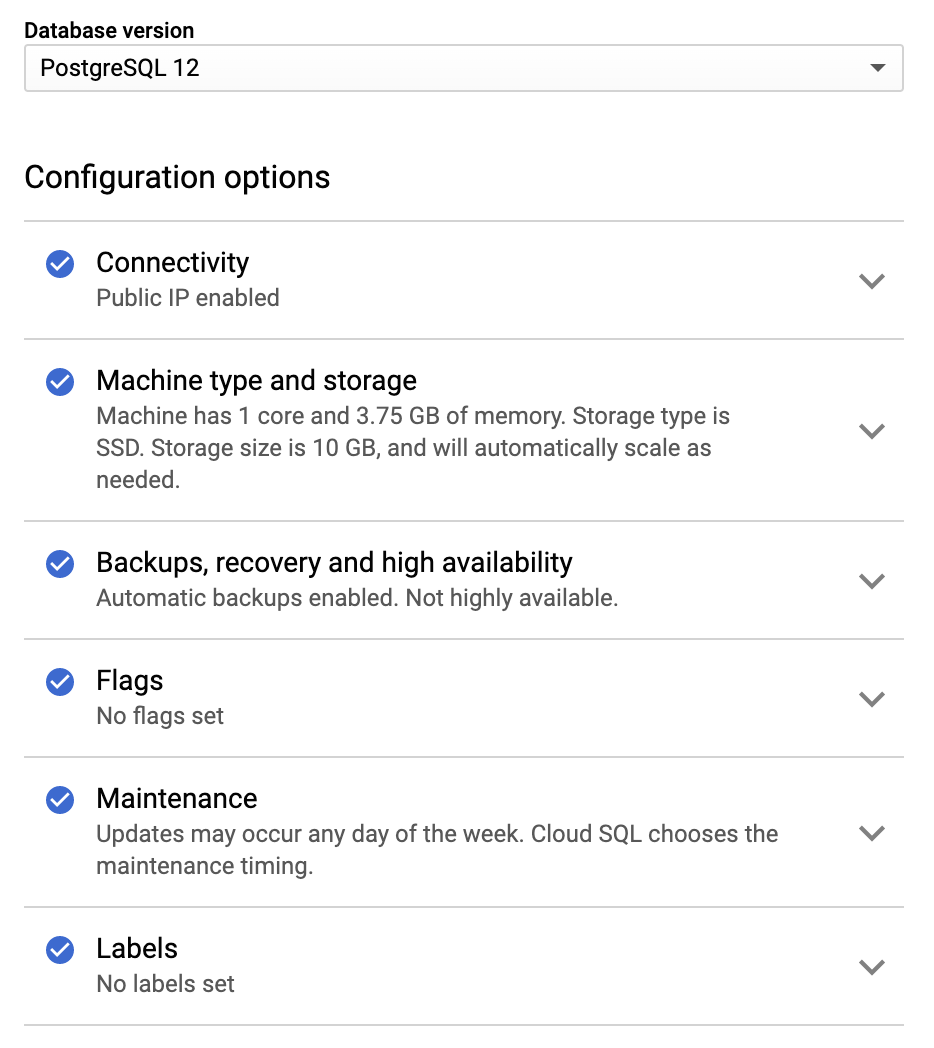
PostgreSQL instance creation flow
Import existing database state
Finally, we want to import the database dump created earlier into a database on our newly created server. Under SQL > Instances in the Cloud Console we need to pick the server instance, and then:
- create a new database by going to
Databasesin the menu and the left and clicking onCreate– see official docs: PostgreSQL , MySQL - [optional] if we’re migrating an existing app, import the SQL dump file that
we previously uploaded to a Cloud Storage bucket, by going back to
Overviewin the menu on the left selectingImportthis time. The form should look something like on the picture below – see official docs: PostgreSQL , MySQL

PostgreSQL database import flow
Set up the application code
So far so good – we migrated the database, now we will migrate the application itself. In this section, we’ll review the setup needed on the application side.
Entry point
When our application runs on App Engine, it needs a designated entry point ->
place where the app execution starts. This by default is a main.py file, which a
typical Django application wouldn’t normally have in place. So we need to bridge
the Django app WSGI configuration to what App Engine expects.
I added a main.py file that looks like so:
from myapp.wsgi import application

app = application
, this assumes that there is a wsgi.py file in the myapp directory of the
application.
Dependencies
App Engine automatically provisions all dependencies listed in a
requirements.txt file in the top-level directory for the app. Note that
AppEngine by default will use gunicorn to serve our app and the official docs
recommend not to include gunicorn in requirements.txt – see
official docs
.
app.yaml
App Engine Standard apps are configured in app.yaml files – see
official docs
.
We will need one too:
runtime: python39

handlers:
- url: /.*
  script: auto
  secure: always

includes:
  - private_gae_env.yaml
Soon, we will revisit this file to ensure the static files are handled
correctly – but first, let’s talk about private_gae_env.yaml mentioned above. As
opposed to app.yaml, this is something I made up – you can remove this line
and not have it. The intention is to have a file that is not checked in to
the code repository, in which we will put credentials such as database
configuration and password defined as environment variables. This gives us some
separation between the credentials that must remain private, and the rest of the
app.yaml file which could very well be published on GitHub.
In the private_gae_env.yaml file we can put entries for the database
configuration like so:
env_variables:
  MYAPP_DB_NAME: 'database name goes here'
  MYAPP_DB_USER: 'database user goes here'
  MYAPP_DB_PASSWORD: 'database password goes here'
  MYAPP_DB_HOST: 'database host goes here'
We can obtain those as follows:
- database name -> this is what we selected when creating the database, we
can also look it up under
Databasesin the Cloud SQL server instance view of the Cloud Console - database user and database password -> this is what we set up when
creating the server instance. We can also look up the user (and reset the
password if needed) under
Usersin the Cloud SQL server instance view of the Cloud Console - database host should look like this:
/cloudsql/<connection name>, and the connection name can be found underOverviewin the Cloud SQL server instance view of the Cloud Console. Remember to add the/cloudsql/prefix!
In the next section, we will see how this is then used in the settings.py file.
settings.py
Time to teach the application how to connect to the PostgreSQL server we set up:
if os.getenv('GAE_APPLICATION'):
    DEBUG = False

    # App Engine's security features ensure that it is safe to
    # have ALLOWED_HOSTS = ['*'] when the app is deployed.
    ALLOWED_HOSTS = ['*']

    DATABASES = {
        'default':
            {
                'ENGINE': 'django.db.backends.postgresql',
                'NAME': os.getenv('MYAPP_DB_NAME'),
                'USER': os.getenv('MYAPP_DB_USER'),
                'PASSWORD': os.getenv('MYAPP_DB_PASSWORD'),
                'HOST': os.getenv('MYAPP_DB_HOST'),
            }
    }
The bit about ALLOWED_HOSTS comes from the official example app .
Static files
Here’s a general approach for handling static files that I found to work well:
- have some designated checked-in directory in which your versioned static
files live. The content of this directory is versioned, but not deployed to
App Engine → for me this directory is called
assets - have some designated staging area where your static files, including derived
static files such as minified CSS, are gathered before deployment. The
content of this directory is not versioned, but it is deployed to App Engine
→ for me this directory is called
static - put together some tiny
deploy.shscript that gathers the static files instaticand then deploys the app - configure
app.yamlto serve everything understaticdirectly, bypassing the app
Here’s how this looks like in practice. In settings.py (this part can and
should apply to both dev and production configuration – so place it outside the
if os.getenv('GAE_APPLICATION'): block):
# Where static files are served from by the dev server.
STATIC_ROOT = os.path.join(PROJECT_PATH, 'static')

# URL prefix used for static files, both in development and production.
STATIC_URL = '/static/'

STATICFILES_DIRS = (('', os.path.join(PROJECT_PATH, 'assets')),)
In deploy.sh:
#!/bin/bash
set -e

rm -rf static
python manage.py collectstatic --noinput
gcloud app deploy
In app.yaml (this includes a bit to serve favicon at /favicon.ico – feel
free to ignore if you don’t care about it):
handlers:
- url: /static
  static_dir: static
  secure: always

- url: /favicon\.ico
  static_files: static/images/favicon.ico
  upload: static/images/favicon\.ico
  secure: always

- url: /.*
  script: auto
  secure: always
Finally, you can add a .gcloudignore file that lists files and directories
that are not uploaded to App Engine and list the versioned static file directory there (again, I call it assets):
# some other stuff we also likely not want to upload
.gcloudignore
.git
.gitignore
__pycache__/
.virtualenv
.vscode

# 'assets' is my versioned directory for static files, I gather
# then into 'static' before deployment and only 'static' should
# be pushed to App Engine
assets
See also the
official docs
for .gcloudignore.
First deployment 🚀
If we did everything correctly, our app should be ready to be deployed and work
on App Engine! Let’s give it a try (see above for what I put in deploy.sh):
./deploy.sh
If everything goes well, we should see something along the lines of:
File upload done.
Updating service [default]...done.
Setting traffic split for service [default]...done.
Deployed service [default] to [<URL>]

You can stream logs from the command line by running:
  $ gcloud app logs tail -s default

To view your application in the web browser run:
  $ gcloud app browse
Schema migrations
In my previous hosting environment I would ssh into the VPS and type
python manage.py migrate to apply any schema migrations on the production
database. How do we do this with the app running on GCP now?
It turns out that we can use a proxy to access the actual production database on
Cloud SQL when running our Django app locally. Thus way, we can run
python manage.py migrate on our local machine and make it apply the migrations
to the production database on GCP.
To set this up, we can follow the
official docs
.
I ended up with the following structure in settings.py (this is for
PostgreSQL, adapting to MySQL should require only minor changes):
if os.getenv('GAE_APPLICATION', None):
    DEBUG = False

    DATABASES = {
        # <Set up the prod database>
    }
else:
    # We're running locally
    DEBUG = True
    if os.getenv('PROXY_TO_PROD'):
        # Proxy the database connection
        DATABASES = {
            'default': {
                'ENGINE': 'django.db.backends.postgresql',
                'HOST': '127.0.0.1',
                'PORT': '3306',
                'NAME': os.getenv('MYAPP_DB_NAME'),
                'USER': os.getenv('MYAPP_DB_USER'),
                'PASSWORD': os.getenv('MYAPP_DB_PASSWORD'),
            }
        }
    else:
        # Run backed by a local SQLite database
        DATABASES = {
            'default':
                {
                    'ENGINE': 'django.db.backends.sqlite3',
                    'NAME': 'myapp',
                }
        }
If we want some extra ergonomics we can add a script (that we will not check in
because it contains credentials) that may be called proxy_manage_py.sh and look like so:
PROXY_TO_PROD=1 \
MYAPP_DB_NAME=<db name> \
MYAPP_DB_USER=<db user> \
MYAPP_DB_PASSWORD=<db password> \
python manage.py $@
Then proxy_manage_py.sh migrate applies the migrations remotely. Also, any
custom manage.py commands we may have in the app will work, too!
Debugging
A few tips for looking into issues:
- any failed deployment display a link to a cloud build log that should tell us more about what’s going wrong
- inspect server errors under Error reporting in the Cloud Console
- logs are available under Logging in the Cloud Console
Additional topics
A few additional notes in separate articles:
- user-uploaded (media) files . Given that on App Engine Standard the app doesn’t have access to the local filesystem, we need to put them somewhere else.
- sending email . Similarly, the modern App Engine Standard runtimes don’t offer built-in email support, but we can set it up using third-party services.
- monthly cost . After a few months I can report back on the cost of this setup.
Conclusion
After experimenting with the new deployment described in this article for a few weeks, I’m pretty happy with the outcomes. The things I’m enjoying the most:
- the ability to inspect the application from the Cloud Console. I can now read logs and watch the QPS graph in close to real-time. (in the previous hosting environment I had to ssh to the VPS and read logs from a file)
- the explicit deployment flow. I can now easily rollback any problematic release from the Cloud Console. (in the previous hosting environment I was git pushing from my machine and git pulling on the server and that was the release process)
- built-in programmatic monitoring. I can now set up alerting, for example when the server error rate goes up.
Good luck setting up your own Django project on GCP!